Descriptions et exemples pour le POV-Ray raytracer par Friedrich A. Lohmueller
Modeler à l'échelle avec POV-Ray
English English English
Italiano  Italiano
Deutsch 

Page d'Accueil
- POV-Ray Tutorial


- Modeler à l'échelle
  avec POV-Ray

  - Fond quadrillé
      en m et cm
  - Vue orthographique
  > Adaption des plans
      au fond quadrillé
  - Rendering
      à vues multiples


Adaption des plans au fond quadrillé

Comment adapter un plan au fond quadrillé en POV-Ray
Pour travailler avec précision nous utilison une caméra 'orthographic' regardant verticalement sur l'image du plan. Nous utilisons un arrière-plan quadrillé avec la largeur de 1m resp. 0,1m.
( La macro 'Raster_Plate', voir : fond quadrillé)
Devant de ce fond quadrillé nous arrangeons un box mince avec une texture de image_map d'une image transparent du plan (gif ou png, non-interlaced !).
Ce box nous devons agrandir au aspect ratio original d'image du plan.

La dimension du box avec l'image du plan :
1. méthode: Nous utilisons une image du plan coupé à longueur ou à 'hauteur du objet. Puis nous pouvons utiliser comme l'échelle la longueur et l'hauteur du objet.
2. méthode: Nous devons savoir la longueur original d´un détail du plan. Nous ajutons un cylindre de cette longueur devant le plan. Puis nous devons agrandir le box d'image du plan jusquà le détail du plan va dans ce cylindre.

Exemple:
  nome d'image du plan : E63_Plan_Side1_255.gif,
  dimensions d'image du plan : 640 x 320 pixel,
  nombre de la palette du fond : 255
  longueur d'objet original : 10,26 meter.
//-------------------------------------------//
#declare Base_Texture =
  texture{ pigment{ color rgb<1,1,1>*1.2 }}
//--------------------------------------------
object{ Raster_Plate(
   1.0,   0.010, // 1st distance/width,
   0.1,   0.080, // 2nd distance/width,
   Base_Texture, // non= pigment{Clear}
   0.6, // Intensity, // Line gray intensity
   <-5.13,-0.05,-0.0>, <5.13,0,5.10>, //box
  ) //----------------------------------------
 rotate<-90,0,0>
 translate<0,0.001,0>
} //------------------------------------------

//#declare Plan_Front =
box{ <0,0,0>,<1,1,0.00001>
   texture{
    pigment{
     // image on xy plane (aspect ratio 1:1)
     // from <0,0,0> to <1,1,0>
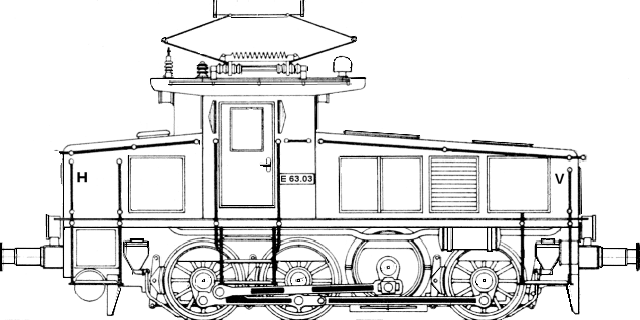
     image_map{ gif "E63_Plan_Side1_255.gif"
     map_type 0 // 0=planar
     interpolate 2 // 0=none, 1=linear,
      // 2=bilinear, 4=normalized distance
     once //
  // For transpartent palette images:
  // (<=256 colors)
  //    gif version 87a, non interlaced,
  // or png palette, non interlaced.
     transmit 255, 1 // Palette, Amount
    } // end of image_map
   } // end of pigment
  } // end of texture
scale<1,320/640,1> // original aspect ratio
translate<-0.5,0,0>// centered in x

//  Adjusting to raster size  -----------------
//original loco length:
scale 10.26 // in meter
translate<0,0.00,-0.01>  // in front!
no_shadow

} // end box with image_map
//------------------------------------------//

The Plan
 Le Plan
Adapting the plan
 L'adaption du plan
Plan adapted
 Le plan adapté a la grillage

Cette scène en POV-Ray: Plan_Loco_001.pov
Image gif nécessaire : E63_Plan_Side1_255.gif

( Le fichier d'image doit être dans la même registre comme
le fichier de la scène ou dans le fichier 'include' de POV-Ray )


Continue with the construction
 Continuer avec la construction
top

© Friedrich A. Lohmüller, 2011
www.f-lohmueller.de