Home
- POV-Ray Tutorial
- POV-Ray Examples
Index of Content
- Geometry
- Architecture
- House part 1
- House part 2
- House part 3
- Roof
- Tower
- Castle
- Window + Door
- Stairs
- Pyramid
- Columns
- Arch
- Fences
- Furnitur
- Household
- Engineering
|
|
House - part 2
Objects: "box"
Methods: "difference", "union", "#declare"
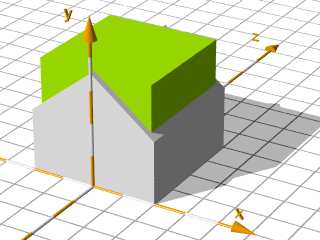
The Construction of a House (inside caved out, Roof).
The inside caved out:
This is done by subtracting a box of the house dimensions reduced by the thickness of the walls -
here realisized by "difference": Basic house shape minus box in the size of the inside space.
An include file to use this object as a read-made object you can find
at my POV-Ray Objects page.
|
//-------------------------------------
#declare Wall_Texture_1 =
texture{ pigment{color rgb<1,1,1>*1.1}
         normal {bumps 0.5 scale 0.005}
         finish {diffuse 0.9}
       } // end of texture
#declare Wall_Texture_2 =
texture{ pigment{color  rgb<1,1,1>*1}
         finish {diffuse 0.9}
        } // end of texture
//-------------------------------------

#declare Wd= 0.20; //thickness of wall

// How to cave out the inside:
difference{ //-------------------------
box { <-Hx,0,0>,< Hx,Hy,Hz>
      texture { Wall_Texture_1}
    } // end of box -------------------
plane{ <0,-1,0>,0
       texture { Wall_Texture_2}
       rotate<0,0,Roof_Angle>
       translate<0,Hy,0>
     } // end of plane ----------------
plane{ <0,-1,0>,0
       texture { Wall_Texture_2}
       rotate<0,0,-Roof_Angle>
       translate<0,Hy,0>
     } // end of plane ----------------
 // inside caved out
box { <-Hx+Wd,0.10,Wd>,<Hx-Wd,Hy,Hz-Wd>
      texture {Wall_Texture_2}
     }
}// end of difference ----------------- |
|
|
|
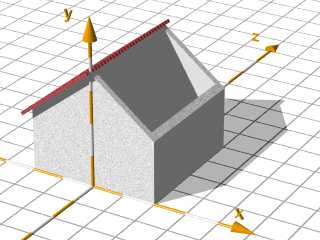
The Roof:
The roof is made by boxes in the height of the
thickness of the roof, rotated by the roof angle
and moved to their position at the top of the house.
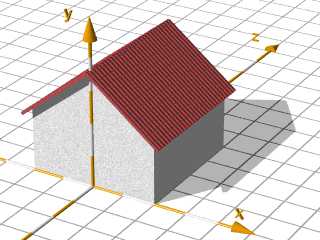
#declare Roof_Texture= //-------------
// layered textures
texture{
  pigment{color rgb<.55,.09,.09>*1.3}
  normal {gradient z scallop_wave
                     scale<1,1,0.15>}
  finish { diffuse 0.9}
} // end of texture 1 ----------------
texture{
  pigment{
      gradient x
      color_map{
      [0.00 color rgbt<1,1,1,1>]
      [0.90 color rgbt<1,1,1,1>]
      [0.95 color rgb<1,1,1>*0.1]
      [1.00 color rgb<1,1,1>*0.1]}
      scale 0.25}
  finish { diffuse 0.9}
} // end of texture ------------------
//--------- end of roof texture ------
#declare Roof_D = 0.10; // thickness
#declare Roof_O = 0.20; // overhang
#declare Roof_L = Hx+0.8;// try!!

// roof parts: first horizontal,
// then sloped + translated upways
box{  // left part of the roof
 <-Roof_L,       0,  -Roof_O>,
 < Roof_D/2,Roof_D,Hz+Roof_O>
 texture{ Roof_Texture
          translate<-0.05,0,0>}
 rotate<0,0, Roof_Angle>
 translate<0,Hy,0>
}
box{ // right part of the roof
 <-Roof_L,        0,  -Roof_O>,
 < Roof_D/2, Roof_D,Hz+Roof_O>
 texture{ Roof_Texture
          translate<-0.05,0,0>}
 rotate<0,0, Roof_Angle>
 translate<0,Hy,0>
 scale<-1,1,1> // mirrowed in x
}
//----------------------- end of roof |
|
Click here for the complete scene description for POV-Ray:
".txt" file or
".pov" file
|
Ready-made POV-Ray objects as
include files and example files you'll find
at the POV-Ray Objects Page
|