Descriptions and Examples for the POV-Ray Raytracer by Friedrich A. Lohmüller
    POV-Ray Examples - How To Make Objects for POV-Ray
Italiano Italiano
Français français
Deutsch Deutsch

Home
- POV-Ray Tutorial
  - POV-Ray Examples
   Index of Content
  - Geometry
  - Architecture
    - House part 1
      - House part 2
      - House part 3
    - Roof
    - Tower
    - Castle
    - Window + Door
    - Stairs
    - Pyramid
    - Columns
    - Arch
    - Fences
    - Furnitur
    - Household
  - Engineering
                                       
 
House

House - part 3

Objects: "box"
Methods: "difference", "union", "#declare"
The Construction of a House (adding Windows + Door).
For the construction of the windows see here Window.
(A door is made in analog way!)
 
An include file to use this object as a read-made object you can find at my POV-Ray Objects page.

Adding Wndows:

The most economic way to cave out the holes for windows and doors: together with the windows and doors we have to defined the holes for them. These objects were subtracted from the walls. In the same position where these window holes are we place the windows and doors adding them by a "union".
For an effectiv placing of windows and doors it's recomanded to declare the positions first, so any changes in one position are affecting both: the position of the window hole as well as the position of the according window!
// ------- window positions --------
// front positions
#declare Window_Positon_1=
                   <-Hx/2,0,Wall_D/3>;
#declare Window_Positon_2=
                   < Hx/2,0,Wall_D/3>;
// right side positions
#declare Window_Positon_3=
              < Hx-Wall_D/3,0,3*Hz/4>;
#declare Window_Positon_4=
              < Hx-Wall_D/3,0,  Hz/4>;
//---------------------------------------
#declare Window =
union{
 difference{
  box{<-0.50,0.80,-.02>,< 0.50,1.80,.02>}
  box{<-0.45,0.85,-.03>,<-0.03,1.27,.03>}
  box{< 0.03,0.85,-.03>,< 0.45,1.27,.03>}
  box{<-0.45,1.33,-.03>,< 0.03,1.75,.03>}
  box{< 0.03,1.33,-.03>,< 0.45,1.75,.03>}
  texture{Window_Texture}
  } // ---end of difference
 box{<-0.49,0.81,0.0>,< 0.49,1.79,0.001>
 texture{T_Glass3}}
 } // --- end of union ------------------

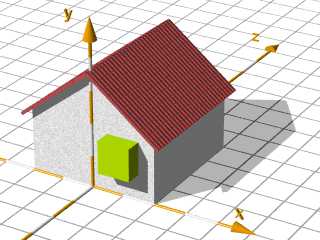
#declare Window_Hole =   //symmetric!!!
  box{<-0.5,0.8,-0.5>,< 0.5,1.8,0.5>
      texture{Wall_Texture_2}
    } // end of box ---------------------
//------- end of window definition ------

// windows holes in house shape
difference{ //---------------------------
box { <-Hx,0,0>,< Hx,Hy,Hz>
      texture { Wall_Texture_1}
    } // end of box ---------------------
plane{ <0,-1,0>,0
       texture { Wall_Texture_2}
       rotate<0,0,Roof_Angle>
       translate<0,Hy,0>
     } // end of plane ------------------
plane{ <0,-1,0>,0
       texture { Wall_Texture_2}
       rotate<0,0,-Roof_Angle>
       translate<0,Hy,0>
     } // end of plane ------------------
 // inside caved out  - innen ausgehölt
box { <-Hx+Wd,0.10,Wd>,<Hx-Wd,Hy,Hz-Wd>
      texture {Wall_Texture_2}
     } // end of box --------------------
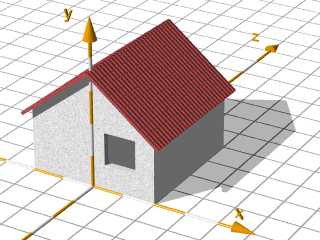
 // window holes caved out
object{Window_Hole
       translate Window_Positon_1}
object{Window_Hole
       translate Window_Positon_2}
object{Window_Hole
       translate Window_Positon_3}
object{Window_Hole
       translate Window_Positon_4}

}// end of difference -------------------

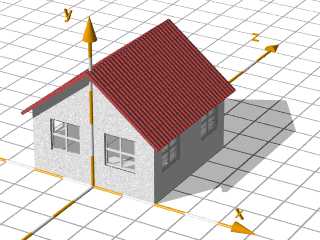
 // Adding the windows:
object{Window
       translate Window_Positon_1}
object{Window
       translate Window_Positon_2}
object{Window rotate<0,90,0>
       translate Window_Positon_3}
object{Window rotate<0,90,0>
       translate Window_Positon_4}
//---------------------------------------


Click here for the complete scene description for POV-Ray:
".txt" file or ".pov" file
Back to part 1
Back to part 2

Here some variations:

Example 1 House 600x450 Example 2 House 600x450 Example 3 House 600x450
Ready-made POV-Ray objects as
include files and example files you'll find
at the POV-Ray Objects Page
top

© Friedrich A. Lohmüller, 2006
www.f-lohmueller.de