Home
- POV-Ray Tutorials
POV-Ray Introduction
Content - INDEX
1. Working with POV-Ray:
"Insert Menu Add-on".
2. Basics on
How To Make a Scene.
3D Coordinates,
Floats and Vectors
3. Scene Structure
Basic example.
4. Scene File Header,
#include files,
camera, light_source.
5. Basic Geometric Objects
sphere, box, cylinder,
cone, torus, plane.
and other shapes
6. Transformations
Streching, Turning,
Moving and others.
CSG: union,
difference, intersection.
7. Colors on Surfaces
texture, pigment, normal, finish
>8. #declare, #local, #macro,
placeholders + flexible objects.
9. #while Loops
Basic examples.
10. #include, include files,
re-usable objects.
11. Efficiency,
speed, flexibility,
modulare working
adapting from 3.1 to 3.5;3.6
adapting from 3.5;3.6 to 3.7
POV-Ray + Windows Vista.
- Insert Menu Add-on
& Download
|
|
#declare, #local - Abbreviations, Placeholders, Variables.
Definition of variable values (floats and vectors), textures and objects
Please keep in mind for choosing names and abbreviations:
> Don't use any specific national characters! Pure ASCII please!
> Don't use build in POV-Ray keywords!
> Capitals and small characters are discriminated!
> It is strongly recommended to use capitals at the beginning of all names defined by yourself!
POV-Ray keywords are starting with small characters!
#declare is used for global valid variables, while in macros or include file
there can be defined with #local only local valid variables. These local variables
can be change inside of a macro or include file (i.e. as a counter in a while loop),
without affecting a globale variable with the same name outside. Locale variables
are not visible (do not exist) outside of the region were they were declared!
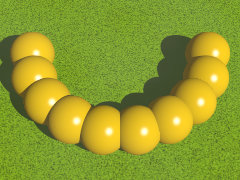
Example for the definition and the use of variables and objects:
#declare R1 = 0.25 ; // ball radius
#declare RR = 1.00 ; // ring radius
#declare Position_1 =  <0,0.25,1> ;
#declare Ball_Texture =
 texture{ pigment{ color rgb<1,0.65,0>}
          finish { phong 1.0 }
        } // end of texture
#declare Ball1 =
 sphere{ <RR,0,0>,R1
         texture{Ball_Texture}}
//-------------------------------------
#declare BallHalfCircle =
union{
  object{Ball1 rotate <0,  0,0>}
  object{Ball1 rotate <0, 20,0>}
  object{Ball1 rotate <0, 40,0>}
  object{Ball1 rotate <0, 60,0>}
  object{Ball1 rotate <0, 80,0>}
  object{Ball1 rotate <0,100,0>}
  object{Ball1 rotate <0,120,0>}
  object{Ball1 rotate <0,140,0>}
  object{Ball1 rotate <0,160,0>}
  object{Ball1 rotate <0,180,0>}
 } // end of BallHalfCircle
// drawing command:
object{ BallHalfCircle
        translate Position_1}
// -------------------------------- end | |
|
#macro ... #end
This allows a much more flexible definition of i.e. objects.
For choosing names and abbreviations see my hint at "#declare".
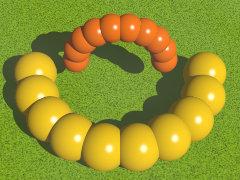
Here an example for using "#macro":
#macro BallHalfCircle (R1, RR, Texture)
#local Ball1 =
 sphere{ <RR,0,0>,R1 texture{Texture}}
union{
  object{Ball1 rotate <0,  0,0>}
  object{Ball1 rotate <0, 20,0>}
  object{Ball1 rotate <0, 40,0>}
  object{Ball1 rotate <0, 60,0>}
  object{Ball1 rotate <0, 80,0>}
  object{Ball1 rotate <0,100,0>}
  object{Ball1 rotate <0,120,0>}
  object{Ball1 rotate <0,140,0>}
  object{Ball1 rotate <0,160,0>}
  object{Ball1 rotate <0,180,0>}
 } // end of BallHalfCircle
#end // ------------------ end of macro
//-------------------------------------
#declare Texture1 =
  texture{ pigment{ color rgb<1,0.65,0>}
           finish { phong 1.0}
         }
#declare Texture2 =
  texture{ pigment{ color rgb<1,0.2,0>}
           finish { phong 1.0}
         }
// drawing commands:
object{
  BallHalfCircle(0.25, 1.00, Texture1)
  translate<0,0.25,1>}
object{
  BallHalfCircle(0.15, 0.50, Texture2)
  translate<0,0.5,1>}
// -------------------------------- end | |
|
|
|


