Home
- POV-Ray Tutorials
POV-Ray Introduction
Content - INDEX
1. Working with POV-Ray:
"Insert Menu Add-on".
2. Basics on
How To Make a Scene.
3D Coordinates,
Floats and Vectors
3. Scene Structure
Basic example.
4. Scene File Header,
#include files,
camera, light_source.
5. Basic Geometric Objects
sphere, box, cylinder,
cone, torus, plane.
and other shapes
6. Transformations
Streching, Turning,
Moving and others.
CSG: union,
difference, intersection.
7. Colors on Surfaces
texture, pigment, normal, finish
8. #declare, #local, #macro,
placeholders + flexible objects.
9. #while Loops
Basic examples.
>10. #include, include files,
re-usable objects.
11. Efficiency,
speed, flexibility,
modulare working
adapting from 3.1 to 3.5;3.6
adapting from 3.5;3.6 to 3.7
POV-Ray + Windows Vista.
- Insert Menu Add-on
& Download
|
|
#include "MyObject.inc"
- Ready Made Objects for Multiple Usage!
Objects, once constructed, can be defined as ready-made objects in
a personal include file.
With this method an object can be used later in other scenes without rewriting or copying
the whole definition!
Splitting bigger scenes in smaller components by using include files is an elementar technology of modular working -
without this it's nearly impossible to make really big and complex projects.
|
Example object:
We first define an object named 'Column_1' as macro:
//----------------- macro Column_1(...)
#macro Column_1( H_C,  // column height
                 R_B,  // base radius
                 R_min,// border radius
                 T_S,  // top scale
               ) //---------------------
union{
 cone{ <0,0,0>,R_B,<0,H_C,0>,R_B*T_S}
 torus{ R_B,R_min translate<0,R_min,0>}
 torus{ R_B*T_S,R_min*T_S
        translate<0,H_C-R_min*T_S,0>}
 }// end Column
#end //------------------- end of macro |
Creating an include file for an object:
For the include file of a single object,
we should choose the name of the include file
according to the objects name!
For choosing names see my hints at "#declare"!
Here we make a new file named 'Column_1.inc':
// POV-Ray include file "Column_1.inc"
//-------------------------------------
#ifndef( Column_1_Inc_Temp)
#declare Column_1_Inc_Temp = version;
#version 3.6;
//-------------------------------------
#macro Column_1( H_C,  // column height
                 R_B,  // base radius
                 R_min,// border radius
                 T_S,  // top scale
               ) //--------------------
//-------------------------------------
union{
 cone{ <0,0,0>,R_B,<0,H_C,0>,R_B*T_S}
 torus{ R_B,R_min translate<0,R_min,0>}
 torus{ R_B*T_S,R_min*T_S
        translate<0,H_C-R_min*T_S,0>}
 }// end Column
#end// ------------------- end of macro
//-------------------------------------
#version Column_1_Inc_Temp;
#end
// ---------------- end of include file |
This file we have to save either in the same directory
as our scene file or in an include file directory available
in the include file paths of POV-Ray.
|
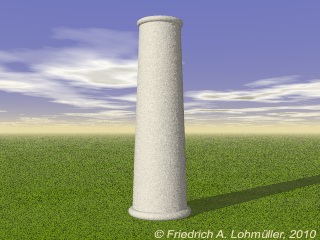
The macro Column_1( ... ) invoked by:
object{Column_1(3.5, // height
                0.5, // base r
                0.06,// border r
                0.75,// top scale
              ) //---------------
  texture{
    pigment{color rgb<1,0.9,0.8>}
    normal{ bumps 0.5 scale 0.01}
    finish{ phong 0.1 }
  } // end texture
  translate<0,0,0>
} //-------------------------- |
Note: The red parts of the include file text are added to avoid that the same
object is declared repeatedly if it's include once.
And these parts change the used POV-Ray version back to the versions for that it was written,
also if some day we have a newer version in use. |
Note: If we include an include file by the command #include "MyObject.inc",
the text of this file will be inserted by POV-Ray sign for sign
just in place of the command during the parsing of the file.
This must be always before the place where we use the objects of this include file.
If the text of an include file defines a complete object,
what we want to use the object multiple times in a scene, we need to
insert the include file only once! |
|
|
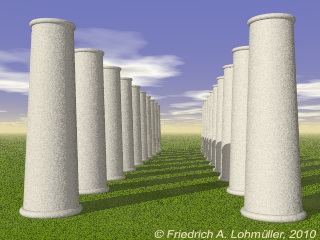
Calling an object from an include file:
Here we include 'Column_1.inc': (only once!)
//---------------------------------------
#declare Column_Texture =
 texture{ pigment{ color rgb<1,0.95,0.8>}
          normal { bumps 0.5 scale 0.01}
          finish { phong 0.1 }
        } // end of texture
//-------------------------------------//
#include "Column_1.inc"
//-------------------------------------//
union{ //--------------------------------
 #local Nr = 0;     // start
 #local EndNr = 10; // end
 #while (Nr< EndNr)
 union{ // inner union
   object{ Column_1(3.5, 0.5, 0.06, 0.75)
           translate<-2,0,0>}
   object{ Column_1(3.5, 0.5, 0.06, 0.75)
           translate< 2,0,0>}
   translate<0,0,Nr*2.5>
 } // end inner union
 #local Nr = Nr + 1;  // next Nr
 #end // --------------- end of loop
texture{  Column_Texture }
rotate<0,0,0>
translate<0,0,0>
} // end of union ----------------------- |
|
Column rows
This scene description for POV-Ray:
scene file: Column_1_Row.pov
include file: Column_1.inc
(Save both files by right click + 'save file as' in the
same directory and start
'Column_1_Row.pov' with POV-Ray.)
|
|
With this mechanism you also can also save your own special textures and colours
i.e. in a file named "My_tex.inc"!
A stock of furniture or/and a collection of airplanes and/or star ships, etc. etc. can be saved in this way as well!!!
|
|


