Descrizioni ed esempi per POV-Ray di Friedrich A. Lohmüller
Design di Superfici con "texture" in POV-Ray -
English English English
Français français
Deutsch Deutsch

Home
- POV-Ray Tutorial

  Design di Superfici
  - Colori e Texture
    Index

    Sintassi di texture
    Testure pronto per l'uso
    Colori Do-it-yourself
    Motivi - patterns
    Liste di motivi
    Warps
    uv_mapping
    Mapping
    - metodi di mapping
    - color_map{...}
    - pigment_map{...}
    - texture_map{...}
    - normal_map{...}
    - average
    - material_map{...}
    - image_map{...}
    - image_map+gif 1
    - image_map+gif 2
    - image_map+gamma
    - bump_map{ ... }
   > transparency maps 1
    - transparency maps 2
    - transparency maps 3
    Sovrapposizioni

    Vostre testure
 
                                           
transparency mappping (1)
Controllare la trasparenza con motivi.

Esempio 1: transparent and semitransparent.
#declare T_Map = // transparency map --
 pigment{
  image_map{ jpeg "Diag_Grid_03.jpg"
             interpolate 2
           } //
          scale 0.135/2
       } // ---------------------------
#declare Opaque_Texture   =
texture{ pigment{ color rgb<1,1,1>*.05}
         finish { phong 0.2 }
       } // ---------------------------
#declare Surface_Material  =
material{
  texture{
    pigment_pattern{ T_Map }
    texture_map{
     [0.0 pigment{rgbf<1,1,1,1>}]
     [1.0 Opaque_Texture  ]
    } // end texture_map
  }// end texture
}// end material ----------------------
box{ <0,0,-0.001>,<1,1,0.001>
     material{ Surface_Material
               scale <1,1,1>*2.45*2
               translate<0,0.1,0>
             } // end material
} // ----------------------------------
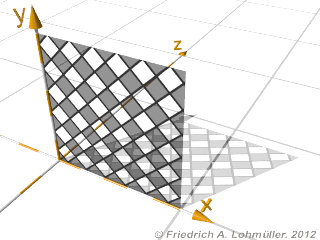
Example trancparency mappping
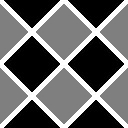
L'immagine utilizzata come transparency map:
Diag_Grid_03.jpg (128x128 pixels) *)
Example trancparency mappping
POV-Ray file della scena: Transparent_Grid_01.pov.
Ciò richiede l'immagine dall'alto: Diag_Grid_03.jpg !
Esempio 2: transparent and semitransparent.
#declare T_Map = // transparency map
pigment{
  image_map{ jpeg "Diag_Grid_03.jpg"
             interpolate 2
           } //
  warp{ cylindrical
        orientation 1 dist_exp 1 }//
  scale 0.135
} // ----------------------------------
#declare Opaque_Texture   =
texture{ pigment{color rgb<1,1,1>*1.1}
         finish {phong 0.2 }
       } // ---------------------------
#declare Surface_Material  =
material{
   texture{
      pigment_pattern{ T_Map }
      texture_map{
        [0.0 pigment{rgbf<1,1,1,1>}]
        [0.3 pigment{rgbf<1,1,1,1>}]
        [1.0 Opaque_Texture ]
       } // end texture_map
     }// end texture
  }// end material --------------------
// ------------------------------------
difference{
 cylinder{<0, 0  ,0>,<0,2.0,0>,0.70 }
 cylinder{<0,-0.1,0>,<0,2.1,0>,0.699}
 material{ Surface_Material
           scale <1,4.90,1>
         }//---------------
 rotate<0,30,0>
} // end difference -------------------
// inner cylinder
cylinder{ <0,0,0>,<0,1.77,0>, 0.60
  texture{
   pigment{ color rgb<0.75,0.5,1> }
   finish { phong 0.5 }
         } //
} // end of cylinder ------------------

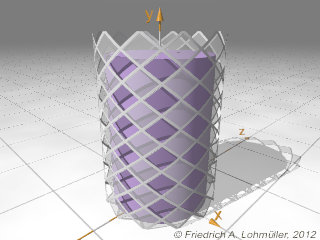
Example trancparency mappping
POV-Ray file della scena: Transparent_Grid_03.pov.
Ciò richiede l'immagine dall'alto: Diag_Grid_03.jpg ! *)


*) Nota: Salvare i file delle immagini utilizzate allo stesso
sottodirectory, come i file di scena o in ogni
sottodirectory altro nei vostri include file paths.
top

© Friedrich A. Lohmüller, 2012
www.f-lohmueller.de