|
Surface Mapping avec 'uv_mapping'
Comment adapter motifs aux surfaces
Normalement motifs procèsural sont défini en 3D dans l'espace, mais souvent nous avons de motifs pour
textures, que sont defini seulement en 2D dans un plan. Le plus souvent cette type de motifs (pattern)
ne vont bien sur surfaces 3D des solides.
Les motifs de checker, hexagon, square, triangle, tiling et pavement sont défini dans le plan de xz.
On doit tourner ces motifs par 'rotate<-90,0,0> pour aligner les motifs avec le plan de xy.
Les motifs de brick et image_map sont defini déja dans le plan xy.
'uv_mapping' est une methode pour ajuster ce type de motifs parmi enrouler (warping) les motifs autour d'un objet.
Les points d'un motif 2D sont indiquer avec des vecteurs 2D, les uv-vecteurs, avec soi-disant uv-coordonnées (u,v).
La coordonnée u va de 0 à 1 (La largheur du motif ou d'image), la coordonnée v va vers le 'haut de
0 à 1 (La 'hauteur du motif ou d'image).
'Surface mapping' par 'uv_mapping' actuellement est défini en POV-Ray pour les objets suivants:
- box : un 'box mapping' ou 'cube mapping' comme dans le 'Sky_Box' et 'cubemaps'.
- sphere : 'spherical mapping' comme dans les 'Sky_Domes' et 'skymaps'.
- lathe, sor: avec un 'spherical mapping' modifié. Ici: u (0...1) enroule autour l'axe y,
les coordonnées v sont reliés avec les 'control points' (0..1) d'objet.
- mesh, mesh2: Les coordonnées uv sont défini pour chaque vertex et interpolé parmi.
- bicubic_patch: Les coordonnées uv si reposont sur les coordonnées parametriques du patch,
étendant avec les 'control points'.
- parametric: le 'map' de les confins d'espace uv, où la surface parametrique est calculée.
- torus : le 'map' d'une région <0,0><1,1>
enroulant les coordonnées de u autour le rayon major, les coordonnées de v autour le rayon minor.
La Syntaxe Générale de 'uv_mapping'
texture {
 uv_mapping pigment{PIGMENT_BODY} | pigment{uv_mapping PIGMENT_BODY}
 uv_mapping normal {NORMAL_BODY } | normal {uv_mapping NORMAL_BODY }
 uv_mapping texture{TEXTURE_BODY} | texture{uv_mapping TEXTURE_BODY)
} |
|
'uv_mapping' pour 'box'
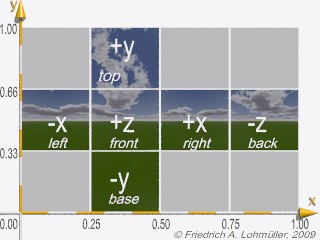
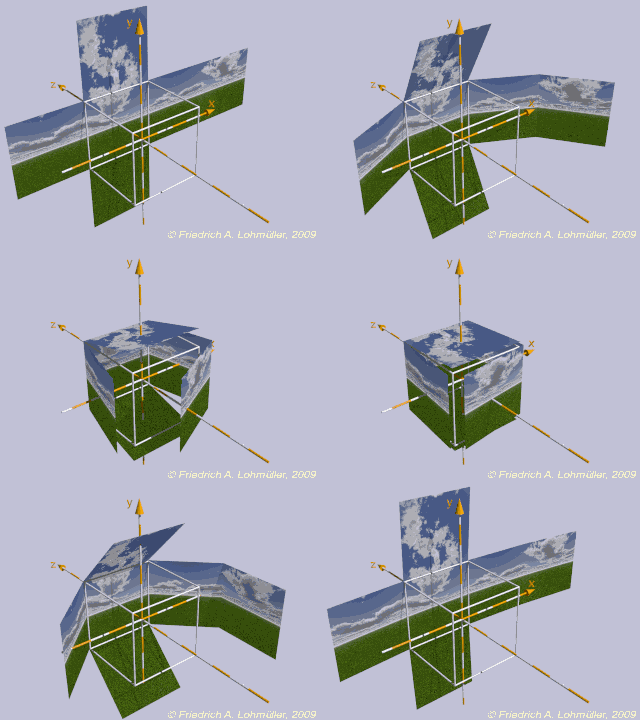
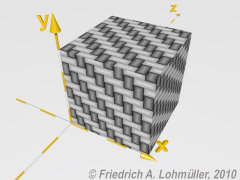
| Le schéma de mapping pour un 'box' est représentée dans les 2 images suivantes:
|
| Le schéma de 'Cube Mapping' en coordonnées uv
|
L'enroulement d'un motif avec 'Cube Mapping'
|
UV_mapping pour 'box' avec un motif (pattern) dans le plan xz.
Un carrelement (tiling) avec une largheur de base de 1 unité :
Le motif doit être réduit par 1/4 pour apparaître dans la même échelle comme sur le plan xz.
Exemple:
box{ <0,0,0>,<1.6,0.5,1>
     texture { uv_mapping
        pigment{
           tiling 6 // 1~24 Pattern_Number
              color_map{
                [ 0.0 color rgb<1,1,1>]
                [ 1.0 color rgb<0,0,0>]
                } // end color_map
           scale 0.10/4
         rotate<-90,0,0>
          scale<1/1.6,2,1>
        } // end pigment
        finish { phong 1}
      } // end of texture

     translate<0,0.0,0>
} // end of box ------------------------ |
|
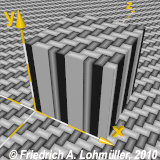
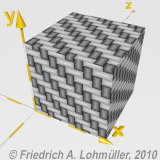
uv_mapping pour box
|
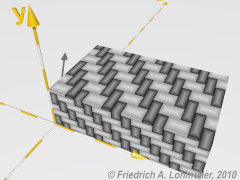
UV_mapping pour 'box' avec longueur, largheur, 'hauteur differentes.
Un carrelement (tiling) avec une largheur de base de 1 unité :
Le motif doit être réduit par un échelle inverse au largheurs des côtés du 'box'!
Exemple:
box{ <0,0,0>,<1.6,0.5,1>;
     texture { uv_mapping
        pigment{
           tiling 6 // 1~24 Pattern_Number
              color_map{
                [ 0.0 color rgb<1,1,1>]
                [ 1.0 color rgb<0,0,0>]
                } // end color_map
           scale 0.10/4
         rotate<-90,0,0>
         scale<1/1.6,1/0.5,1>
        } // end pigment
        finish { phong 1}
      } // end of texture

     translate<0,0.0,0>
} // end of box ------------------------ |
|
uv_mapping pour box
|
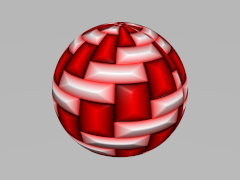
uv_mapping pour 'sphere'
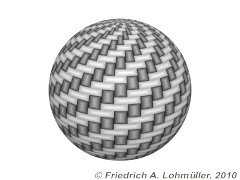
Un motif dans le plan xz 'mapped' sure la surface d'une sphère :
|
Exemple:
sphere{ <0,0,0>, 0.75
     texture { uv_mapping
        pigment{
           tiling 6 // 1~24 Pattern_Number
              color_map{
                [ 0.0 color rgb<1,1,1>]
                [ 1.0 color rgb<0,0,0>]
                } // end color_map
           scale 0.025
         rotate<-90,0,0>
        } // end pigment
        finish { phong 0.1}
      } // end of texture
translate<0.5,0.5,0.5>
} // end of sphere ------------------------- |
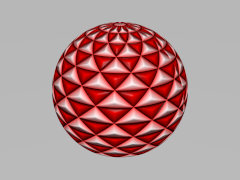
Et avec un color_map 'haut en couleurs :
#declare Pigment_1 =
   pigment{
      tiling 3 // 1~24 Pattern_Number
      color_map{
                [ 0.0 color rgb<1,1,1>]
                [ 0.5 color rgb<1,0,0>]
                [ 1.0 color rgb<0,0,0>]
               } // end color_map
      scale 0.075
      rotate<-90,0,0>
    } // end pigment
// -----------------------------------------
sphere{ <0,0,0>, 0.75
   texture {
      pigment{ uv_mapping Pigment_1 }
      normal { uv_mapping
         pigment_pattern{ Pigment_1 }
         0.25} // end normal
        finish { phong 0.1}
      } // end of texture
translate<0.5,0.5,0.5>
} // end of sphere ------------------------- |
la même effet par warped tiling:
#declare Pigment_1 =
   pigment{
      tiling 6 // 1~24 Pattern_Number
      color_map{
                [ 0.0 color rgb<1,1,1>]
                [ 0.5 color rgb<1,0,0>]
                [ 1.0 color rgb<0,0,0>]
               } // end color_map
      scale 0.075
      rotate<-90,0,0>
      warp{ spherical
                  orientation <0,0,1>
                  dist_exp 0
                } // end of warp
    } // end pigment
//------------------------------------------
sphere{ <0,0,0>, 0.75
   texture { // no uv_mapping !
      pigment{ Pigment_1 } // end pigment
      normal{
         pigment_pattern{ Pigment_1 }
         0.5} // end normal
      finish { phong 0.1}
   } // end of texture
translate<0.5,0.5,0.5>
} // end of sphere ------------------------- |
|
uv_mapping avec sphere
uv_mapping avec sphere
warped tiling on a sphere
Pour plus sur 'warp' voir ici:Mapping avec warps
|
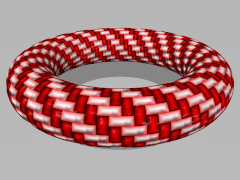
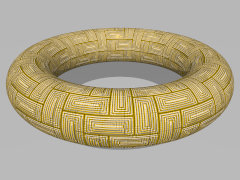
'uv_mapping' pour 'torus'.
Un motif avec 'tiling' dans le plan xz 'mapped' sur un 'torus':
|
Exemple:
sphere{ <0,0,0>, 0.75
     texture { uv_mapping
        pigment{
           tiling 6 // 1~24 Pattern_Number
              color_map{
                [ 0.0 color rgb<1,1,1>]
                [ 0.5 color rgb<1,0,0>]
                [ 1.0 color rgb<0,0,0>]
                } // end color_map
      rotate<-90,0,0>
      //frequency 10
      scale<0.05,0.2,1>*0.25
        } // end pigment
        finish { phong 0.1}
      } // end of texture
translate<0.5,0.5,0.5>
} // end of torus ------------------------- |
|
uv_mapping sur 'torus'
uv_mapping sur 'torus' et 'frequency 10'
|
|
